
When prospecting about creating my Blog, I went throught the normal questions that probably everyone meet. Why would I loose precious hours of my life doing something that anyway nobody is gonna to read. Here are my thoughts about this non-sens and what I learnt…
My Reflexions on the topic
In short, here the few questions I went through. Why, Where, Which way, Which Theme ? By the way, you can notice that those questions go from theory to practice.
The big question ?
Why would you like waste your precious time on a blog ? A search on google “Why would you like a blog ?” will lead you to conclusion that´s good for your bisness. You need to be visible on the net to increase you credibility as an expert and so on. Nonetheless, I was recently listening a guy on Youtube who critized blogs. Everybody is doing it. At the end, everybody start it but nobody keep up writing articles. It ends looking as a poor vitrin of yourself, and for good reasons, if you do not fuel your blog with regular new articles. Anyway, this guy end up showing some interesting blogs with unexpected content and remember us that it’s still worth it but ask effort. And you, are you bloging ?
So in my case, first it’s an exercice. Due to my IT job, I need to see how does it work. What are the possibilities and technology available for it. Second, I wanted a place with multiple purpose. A place for article about my thoughts and findings like this one but also a place to centralize my documentation. Longtime ago, when I started in IT and did not know what I was doing and I simply took notes in OneNote. I know, I should not do this. I was young and did not know what I was doing… For technical notes, that’s not the best. No versioning, no code highlight, and proprietary software. Sharing some notes, also ask extra effort to export in Word document before to be send, the copy paste which in some case trun to image instead of staying plain text, the search engine which is not satisafying, etc. Along the years, my personal notes were growing and it got tedious to keep it ordered.
Notes tools, even payed one, are not respecting privacy. Funny to see so many youtube videos about Obsidan and Notions and hard to believe they do not steal users’ data to feed there advertiser or LLM programs. If I define my needs, I just need a WYSWYG for markdown that I can edit and read in my terminal and an Editor and be able to share if I want, but still be able to move from an hosting solution to another. It need to stay simple and Opensource. First I add the idea to move everything in markdown, and put it in an mdBook, but that’s would be only a documentation solution. Good for a Wiki, but could be good to write some personal thoughts, so came the blog idea. Let’s go for a blog. It’s also a way to get open to the 🌏.
Where to host my Blog ?
Of course, I first thought about self hosting on VPS but to much hassle when there is much easier options, like Hubspot or Wordpress. Those are CMS, the job is done for you. Then I do not see the possibility to really move from those. You can export a XML from Wordpress or an HTML in Hubspot to move to another platform and then hassle to understand why it does not fit to the new platform. It’s hard to believe, there will be no vendor locking behind. So let’s be serious and not fall in some trap.
So Github offer to publish for free your blog with Github page. Except that you won’t be able to choose your domain (except if you pay for it, of course), one big benefic of doing so, is the Github workflow which will allow you to autodeploy as we will see later. You can always move to another repository or even to some self-hosting. It’s always benefic to work in collaboration, that’s the how I was all my career learning.
You can have One site per GitHub account and organization in this case your blog will be available at https://{{username}}.github.io like this one or you can unlimited project sites in this case, you site will be avalaible at http://{{username}}.github.io/repository. The last option, could be a good choice for documenting a project with a mdbook include in the project.
Which tech to pickup ?
A good companion to Github pages are the static site generators. Those static site generators are framework which take articles in markdown then generate a static site. Markdown is a easy language, popular for writing docs and allow easy to customization. One thing that I really appreciate with markdown is how uniform you notes became. Github pages + Hugo + Markdown do the jobs quite effectively with a quick effect. After one hour, this site was already running and presenting good. Tweeking is relatively intuitive, of course you won’t be able to create crazzy effect with dynamic data. Keep it simple and stupid.
Working with Hugo is pretty convenient, you draft your article then launch hugo server -D so you can see in your browser how looks your blog with all draft articles. Oki but why not Zola or Jekyll… Jekyll is the default choice for a Github Page in ruby but most of the interesting themes are charged. Zola, I found too few themes. So Hugo is popular choice, so plenty of documentations and tutorials.
Which awesome theme to use ?
Looks trivial, but a theme well documented make the difference. Some of the theme have bearly documentation or redirect to hugo pages. Plus somes essantials features, nothing fancy but you would expect :
- A Table of Contents.
- Multilingual.
- Local Search.
- Syntax Highlighting.
- Possibility to Comments.
- Font Size Switcher.
- Responsive.
- Light/Dark mode
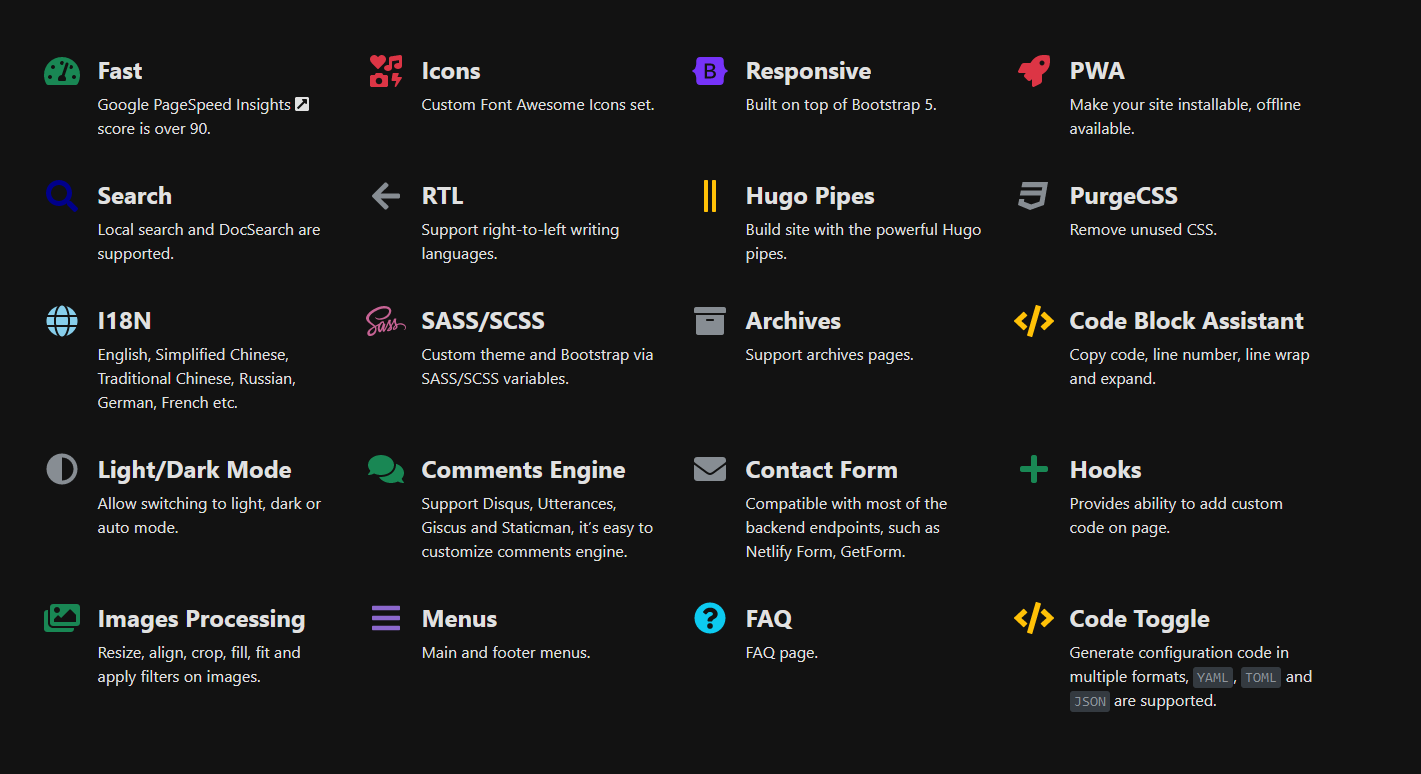
So I went through Hugo-theme-bootstrap which look quite classical but pretty efficient, plenty of widgets which make the blog quite confortable, easy to use and to developp and not too flat.
Here a quick over view of what this theme have to offer:
Let’s Practice
First, note that’s everything what I will describe below have to match with Hugo-theme-bootstrap and some slitghly changes could occur with other theme.
First the Prerequisites
As prerequisites, we need Nodejs, npm, GO, dart SASS, and Hugo extended version as describe here
This was done on an Ubuntu WSL:
# Install nodejs and npm
sudo apt install nodejs npm git

# Install GO
wget https://go.dev/dl/go1.21.0.linux-amd64.tar.gz
sudo tar -C /usr/local -xzf go1.21.0.linux-amd64.tar.gz
export PATH=$PATH:/usr/local/go/bin

# Install DART SASS
DART_SASS_VERSION="1.66.1"
curl -LJO https://github.com/sass/dart-sass/releases/download/${DART_SASS_VERSION}/dart-sass-${DART_SASS_VERSION}-linux-x64.tar.gz
tar -xf dart-sass-${DART_SASS_VERSION}-linux-x64.tar.gz
sudo cp -r dart-sass/* /usr/local/bin
rm -rf dart-sass*

# Install Hugo source
HUGO_VERSION="0.117.0"
curl -LJO https://github.com/gohugoio/hugo/releases/download/v${HUGO_VERSION}/hugo_extended_${HUGO_VERSION}_linux-amd64.deb
sudo apt install -y ./hugo_extended_${HUGO_VERSION}_linux-amd64.deb

hugo version
hugo v0.117.0-b2f0696cad918fb61420a6aff173eb36662b406e+extended linux/amd64 BuildDate=2023-08-07T12:49:48Z VendorInfo=gohugoio
To be fair, you could also do it with snap:
sudo snap install dart-sass

sudo snap install hugo

which hugo
/snap/bin/hugo

hugo version
hugo v0.117.0-b2f0696cad918fb61420a6aff173eb36662b406e+extended linux/amd64 BuildDate=2023-08-07T12:49:48Z VendorInfo=snap:0.117.0
Creating the Project
Create a blank project in Github and clone it.
cd myblog
git submodule add https://github.com/razonyang/hugo-theme-bootstrap themes/hugo-theme-bootstrap
git clone https://github.com/razonyang/hugo-theme-bootstrap-skeleton /tmp/hbs-skeleton
mkdir config
cp -a /tmp/hbs-skeleton/config/* ./config
cp -r /tmp/hbs-skeleton/content/* ./content
cp -r /tmp/hbs-skeleton/archetypes/* ./archetypes
cp -r /tmp/hbs-skeleton/static/* ./static
cp -r /tmp/hbs-skeleton/assets/* ./assets
sed -i "s/theme:.*/theme: hugo-theme-bootstrap/g" config/_default/config.yaml
hugo mod npm pack
npm install
hugo server
Few Settings
The two first to complete author.yaml which contain all your social link and params.yaml for global settings about appearance and options.
Add a language
First, the language need to be listed in ./config/_default/languages.yaml then create config.lg.yaml and if you have a custom menu menu.lg.yaml. Then you will have to create in index.lg.md next to your index.md.
config git:main ❯ tree -L 2
.
├── _default
│   ├── author.yaml
│   ├── config.fr.yaml
│   ├── config.pl.yaml
│   ├── config.yaml
│   ├── languages.yaml
│   ├── menu.en.yaml
│   ├── menu.fr.yaml
│   ├── menu.pl.yaml
│   ├── params.yaml
│   ├── server.yaml
│   └── social.yaml
└── production
    ├── config.yaml
    └── params.yaml
A word on giscus
In config/default/params.yaml, there is a bloc on giscus config, a comments system powered by GitHub Discussions, so the comments left on your articles goes in discussions of your github Pages.
So to do so, you will need to:
- make your repository public.
- enable discussions in the project settings.
- activate giscus app for on your account (you can limit to your blog project)
- Then, giving the URL of your repository
After custom config, on my case I left everything by default, you got a block of xml values that you can reuse in the config/default/params.yaml of your Hugo Blog.
# See https://giscus.app
giscus:
  repo: "MozeBaltyk/mozebaltyk.github.io" # required.
  repoId: "R_kgDOKJSCfA" # required. R_kgDOKJSCfA
  category: "General" # required.
  categoryId: "DIC_kwDOKJSCfM4CYvA_" # required.
On their side, visitors will need a Github account and must authorize the giscus app to post on their behalf using the GitHub OAuth flow.
Change the Tables of Contents
Also the table of content take only the title starting from h2 end to h3 but no parameter seems to exist to change this in ./config/_default/params.yaml
Change the code highligthing
Import the chromastyles in your project:
hugo gen chromastyles --style=dracula > assets/main/scss/_highlight.scss
Add some extras icons
You will be able to add icons from fortawesome by completing the ./assets/icons/custom.js, then use those icons in CSS marks.
import { faBlog, faBook, faFile, faNewspaper, faAnchor, faInfinity, faCode, faBug, faLightbulb, faTerminal, } from '@fortawesome/free-solid-svg-icons';
// import { faAddressBook } from '@fortawesome/free-regular-svg-icons';
// import { faAmazon, faGoogle } from '@fortawesome/free-brands-svg-icons';

const icons = [
    faBook, faBlog, faFile, faNewspaper, faAnchor, faInfinity, faCode, faBug, faLightbulb, faTerminal
    // faAddressBook,
    // faAmazon, faGoogle,
];
export default icons;
Edit Articles
Of course, using your vim editor with your favorite customization, you will enjoy better articles writing.
Simple way to do an article (one folder by articles):
hugo new news/new-post/index.md
hugo new news/new-post/index.fr.md
hugo new news/new-post/index.pl.md
Several articles in one folder (one _index.md + several articles):
vi docs/Devops/Containers/_index.md
hugo new docs/Devops/Containers/docker.md
hugo new docs/Devops/Containers/podman.md
Note that in docs the _index.md become a Section in the Menu.
Please remind that the created posts are generally in draft state. You’ll need to specify the -D parameter of the command hugo server for previewing.
Similarly, you need to change the draft to false or remove draft parameter if you want to publish the article.
images
About images, either you had in ./static/your-articles-name/an-images.webp and define it in your article’s front. The images on front matter are preferred.
---
title: 📡 The Bad, the Good and the Ugly Git
[...]
authors:
  - mozebaltyk
images: [./bad-good-ugly-git/carousel.webp]
---
Another method is to put it in the article´s folder.
Page images resources that match the filename’s patterns: feature, cover and thumbnail. Such as posts/my-page/feature.png, posts/my-page/thumnail.jpg.
The page images resources will be resized to several smaller versions to suit the users devices for saving the bandwidth.
A parameter exist to make this image appear above the content or not, in params.yaml set featuredImage: true.
Then during the writing of the articles, just put the image in the article folder (with a name different from feature, cover or thumbnail) and add it in the article with 
Organisation
Taxonomies are classifications of logical relationships between content. Understand the taxonomies, will allow you to organize your blog more efficiently.
- series
- categories
- tags
- featured
Publish it
To deploy the blog, I simply use Github Wokflow which build and publish it with Github Pages. Here, you can adopt several strategy for your own deployment.
I started with everytime that I was pushing the code, it deploy. It gave me no time after saving to read again my articles. Then I put it on workflow_dispatch, so I manually trigger the workflow to publish it. But the proper way to do, I just push on branch gh-pages which is set as the default then merge it with the main so it trigger the publication only when it arrive on the main branch.
In the settings, in the tab branch protection, an option Lock branch prevent to directly commit on main.
From Github documentation:
Branch is read-only. Users cannot push to the branch.
And option Require a pull request before merging oblige you to review changes.
From Github documentation:
When enabled, all commits must be made to a non-protected branch and submitted via a pull request before they can be merged into a branch that matches this rule.
I will not put all the workflow code, you can get it here.
Here just a general idea about the two jobs for building and deploying:
jobs:
  # Build job
  build:
    runs-on: ubuntu-latest
    env:
      HUGO_VERSION: 0.117.0
    steps:
      - name: Install Hugo CLI

      - name: Checkout 🛎️

      - name: Setup Node

      - name: Cache dependencies

      - name: Install dependencies

      - name: Setup Hugo

      - name: Setup Pages

      - name: Install Node.js dependencies

      - name: Build with Hugo

      - name: Upload artifact

  # Deployment job
  deploy:
    environment:
      name: github-pages
      url: ${{ steps.deployment.outputs.page_url }}
    runs-on: ubuntu-latest
    needs: build
    steps:
      - name: Deploy to GitHub Pages 🚀
        id: deployment
        uses: actions/deploy-pages@v2
Update it
Set your .gitignore:
.hugo_build.lock
hugo_stats.json
node_modules/
resources/
Then update the theme
cd themes/hugo-theme-bootstrap
git fetch
git checkout [version]
cd ../../
hugo mod npm pack
npm update
git add themes/hugo-theme-bootstrap package.hugo.json package.json package-lock.json
git commit -m 'Bump theme to [version]'
💡 Bonus point
For those who read till the end, do not forget to put some funny markdown emojis in your markdown !
Sources
See also documentation of this Awesome Hugo theme.
See also README of this theme.
See also Deployment of this theme.
See also Github Pages.


Comments